|
|||||||||||||||||||||||||||||||||||||||||||||||||||||||||||||||||||||||||||||||||||||||||||||||||||||||||||||||||||||||||||||||||||||||||||||||||||||||||||||||||||||
Horticulture :: Plantation Crops :: Cocoa |
|||||||||||||||||||||||||||||||||||||||||||||||||||||||||||||||||||||||||||||||||||||||||||||||||||||||||||||||||||||||||||||||||||||||||||||||||||||||||||||||||||||
Cocoa (Theobroma cacao L.)
Malvaceae
Cocoa is an important commercial plantation crop of the world. Cocoa is a crop of humid tropics and so it was introduced as a mixed crop in India in areas where the environments suit the crop. It is cultivated in coconut and arecanut plantations large scale from 1970 onwards. It is grown as an under- storey intercrop with sufficient shade in southern states of India. In India, the current production is about 12,000 Metric Tonnes and Tamil Nadu produces about 400 Metric Tonnes. Climate and soil The natural habitat of the cocoa tree is in the lower storey of the evergreen rainforest, and climatic factors, particularly temperature and rainfall, are important in encouraging optimum growth. Cocoa is a perennial crop, and it can withstand different seasonal variations with good health and yield potential. Cocoa is normally cultivated at altitudes upto 1200 m above MSL with an annual rainfall of 1000mm to 2000mm and a relative humidity of 80 % with maximum 350C and minimum temperature of 150C. Cocoa can be grown as intercrop in coconut and arecanut gardens. It is predominantly grown on red laterite soils. It thrives well on wide range of soil types with pH ranging from 4.5- 8.0 with optimum being 6.5- 7.0. Varieties There are three varietal types in cocoa namely Criollo, Forastero and Trinitario. Forastero types are known to perform well under Indian conditions. KAU Varieties and hybrids Central Plantation Crops Research Institute, Vittal varieties and hybrids.
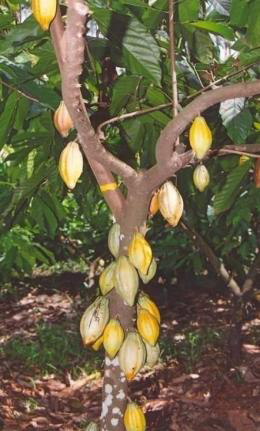
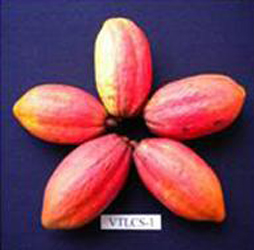
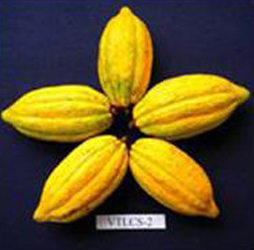
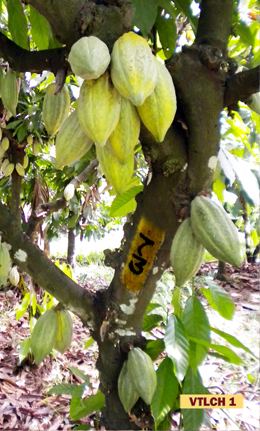
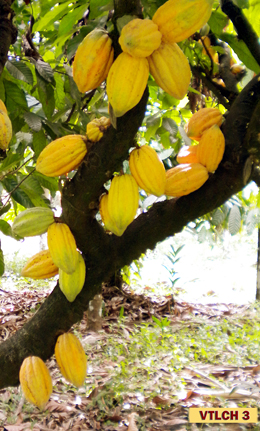
Propagation Cocoa can be propagated by seeds. Seeds are to be extracted from pods. Cocoa pods take 150-170 days from pollination to attain the harvest stage. The stage of maturity is visible from the change of pod colour from green to yellow (Forestero) and red to yellow (Criollo). Collection of seeds from biclonal or polyclonal seed gardens involving superior self-incompatible parents is recommended to ensure genetic superiority of planting materials. In TNAU coconut nursery, a poly clonal seed garden with 7 improved clones of KAU (CCRP1 to CCRP7) and Vittal cocoa clone 1 and 4 hybrids namely VTLCH1 to VTLCH4.
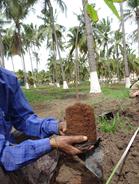
Harvested seed pods can be stored in shade upto one week. Viviparous germination is reported in ripe cocoa which may affect the percentage of germination if it is stored beyond one week. Seeds are to be sown immediately after extraction from the pods. Viability of the beans can be extended for some more days if freshly extracted seeds are stored in moist charcoal and packed in polybags. Other alternative is extracting beans, removing the testa and packing in polythene bags. Potting media Red Soil + Sand + FYM @ 2:1:1 + Super phosphate (5 kg/ton) was found to be best media for growth and development of cocoa seedlings Vegetative propagation As the seedling progenies showed wider genetic variability, to maintain true to types, asexual or vegetative propagation is followed. Grafting and budding are being followed in multiplication of cocoa. It also ensures multiplication of identified high yielding clones in large quantities. Though vegetative propagation of cocoa by budding, rooting of cutting and grafting are feasible, the widely accepted methods in India are budding and grafting.
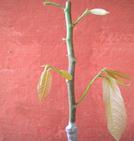
Selection of planting materials
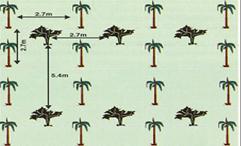
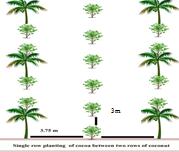
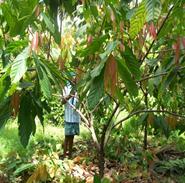
Time and method of planting Cocoa is a shade loving plant. During its seedling period it requires about 50% shade and later the shade requirement is about 40%. The plant is grown as a mixed crop with other plants like spices and rubber mainly under rainfed conditions. Cocoa is planted as an intercrop in coconut and arecanut gardens.
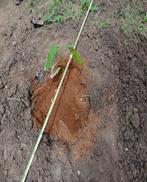
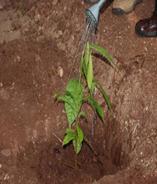
Pits of 50 cm x 50 cm x 50 cm are dug, allowed to weather for one month and refilled with topsoil and 15-20 kg of compost of FYM to ground level. Tear off the polybags carefully, place the soil ball with the seedlings in the planting hole with minimum disturbance and press the soil around firmly. Planting should coincide with the onset of monsoon, but in places where irrigation is resorted to, flexibility in the time of planting is possible.
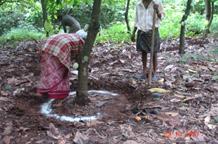
Irrigation in cocoa Cocoa is usually grown in areas where water availability is adequate. Cocoa plants are sensitive to drought, irrigation in such cases becomes essential. During summer, as it exists in Southern India, the crop requires irrigation at weekly intervals. When it is grown as mixed crop with arecanut, the crop is to be irrigated once in a week during November-December, once in 6 days during January-March and once in 4-5 days during April-May with 175 litres of water.
Soil nutrient management Soil nutrient management is critical to the general health of the tree, particularly where cocoa is grown on poor soils with low nutrient levels. The fertility of soils under cocoa plantations with complete canopy formation can be maintained or sustained for a fairly long time due to the ability of cocoa fallen leaves to recycle nutrients back into the soil and decomposition of leaf litter. However, continuous harvesting will eventually result in loss of soil nutrients Fertilizer schedule for cocoa An annual application of the following schedule should be applied in two equal splits, the first dose in April- May and the second dose in September- October i.e. pre and post monsoon applications.
Method of application Fertilizer may be applied uniformly around the base of the tree up to a radius of 30 cm during the first year, forked and incorporated into the soil. For grown up plants the best method is to rake and mix the fertilizers with soil in shallow basins of around 75 cm. This radius may be increased gradually upto 150 cm after third year. Care should be taken not to spill the inorganic fertilizers on the trunk, branches or leaves of young trees in order to avoid burning.
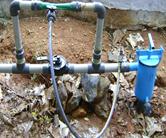
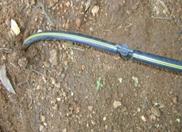
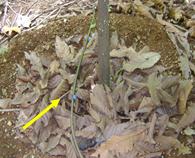
Drip (Fertigation) Fertilizers can be applied through drip irrigation system (fertigation). Weighed quantity of fertilizers as per schedule was dissolved in water and then injected to sub-main through venturi and then to lateral lines as per treatment. Drip irrigation is done once in 2 days. The fertilizers are applied through drip irrigation at weekly intervals. 100:40:140 kg of N, P and K are applied through drip and fertigation in different stages of crop growth as detailed below.
*Water soluble fertilizers : All 19(19% N: 19 % P: 19 % K), Mono – Ammonium Phosphate (MAP – 12:61:00 % NPK), Proprietary water Soluble form of N and K fertilizers containing 13% N and 45 % K (Multi ‘K’) and Urea (46% N)
100 % RDF as WSF through fertigation by drip irrigation recorded more pod weight (486.82 g), number of pods tree-1 (56.87), Pulp + bean weight pod-1 (148.79 g), number of beans per pod (48.62), single bean fresh weight (3.10g), single bean dry weight (1.24 g) and dry weight of the beans per tree (3.429 g). Nutrient management in cocoa Sixteen plant nutrients are essential for proper crop development. Each is equally important to the plant, yet each is required in vastly different amounts. These differences have led to the grouping of these essential elements into three categories; primary (macro) nutrients, secondary nutrients, and micronutrients. Primary (macro) nutrients Primary (macro) nutrients are nitrogen, phosphorus, and potassium. They are the most frequently required in a crop fertilization program. Also, they are need in the greatest total quantity by plants as fertilizer. Secondary Nutrients The secondary nutrients are calcium, magnesium, and sulphur. For most crops, these three are needed in lesser amounts that the primary nutrients. They are growing in importance in crop fertilization programs due to more stringent clean air standards and efforts to improve the environment. Micronutrients The micronutrients are boron, chlorine, cooper, iron, manganese, molybdenum, and zinc. These plant food elements are used in very small amounts, but they are just as important to plant development and profitable crop production as the major nutrients. Especially, they work "behind the scene" as activators of many plant functions like chlorophyll production, carbohydrate formation, cell division and starch formation etc., Micronutrient deficiency Zinc Deficiency Symptoms are chlorosis of the leaves. This appears in patches and in advanced stages the green areas are found only along the vein margins, giving a vein banding appearance to the leaves. Affected leaves show mottling and crinkling with wavy margin. Most of the younger leaves become narrow and sickle shaped showing characteristic ‘little leaf’ symptom. Symptoms on twigs include rosette and dieback. Shortening of internodes causes a rosette type of growth. Management: Foliar spray of a mixture of 0.3% (3gm in 10 litter of water) Zinc Sulphate and 0.15% (w/v) lime. Training and pruning Pruning and shade management are essential in cocoa. Pruning involves thinning of branches and removal of old or dead stems, whilst shade management involves leaving forest trees and/or planting shade trees to optimise the light intensity in the cocoa grove.
Management practices:
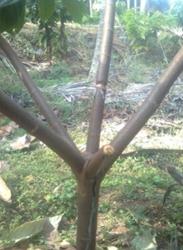
Pruning and height control The basic aim of pruning cocoa trees is to encourage a tree structure that allows sunlight to filter through to the main branches and trunk (what is known as a jorquette) to stimulate flowering and facilitate harvesting. Pruning generally takes place twice a year. The first pruning is done after the main harvest (from April to July) and just before the rainy season, and the second pruning five months later, during the months of November and December.
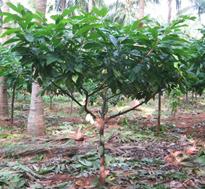
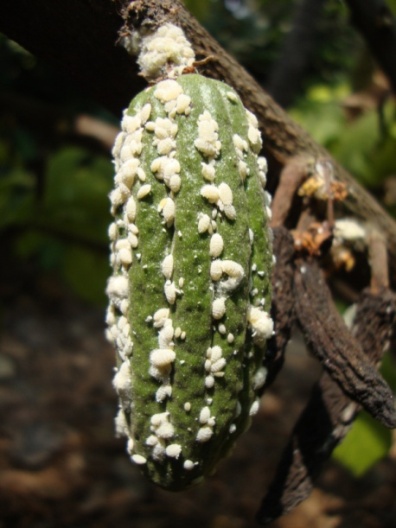
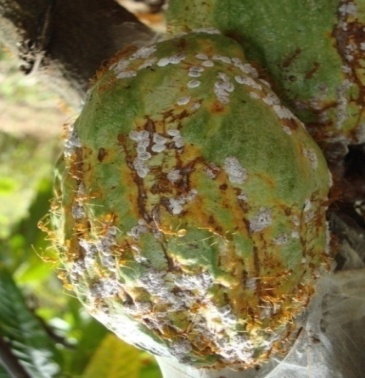
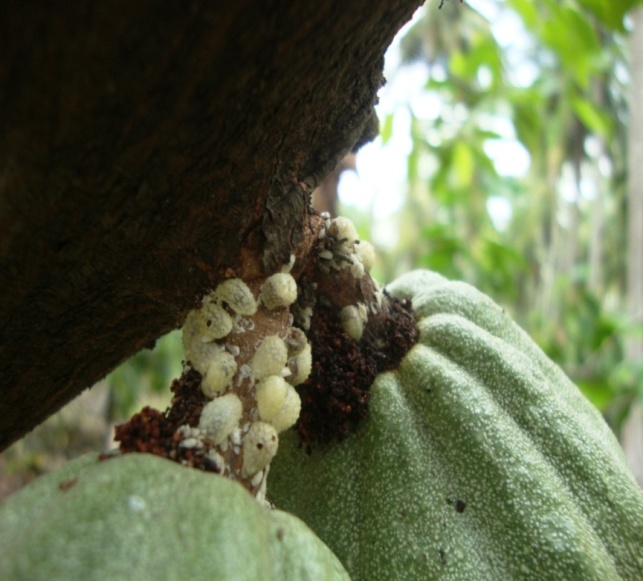
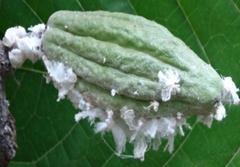
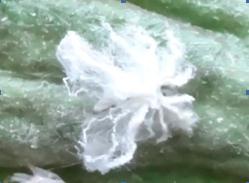
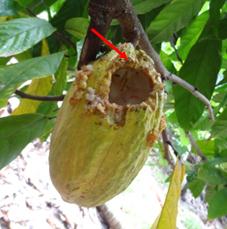
Pruning of grafted plants Pruning of grafted plants is done, after first year of planting, primary pruning should be done to obtain a supporting framework of one or more upward growing main stems. Then drooping or inward growing branches are to be removed. Secondary pruning is suggested to develop well- shaped canopy and desired canopy should be maintained in umbrella shaped form with about 3.8 m to 4.2 m spread and 2.7 m height depending upon the space and main crop in which cocoa is under planted/grown. Pruning is usually done annually in August- September. The proper pruning of cocoa ensures adequate ventilation in garden; maintain tree height, makes spraying and harvesting operations easier. It also prevents damage during the harvesting operation for the companion crop. Plant protection in cocoa Pests and diseases are important risk to productivity and quality of harvest which in turn affects the returns to the farmers. Since cocoa is an introduced crop the more important for the farmer is to be clear about the pests and diseases and be able to identify the symptoms correctly. Pest management 1. Mealy bugs (Planococcus lilacinus, Planococcus citri, Paracoccus marginatus and Rastrococcus iceryoides) It colonizes on the tender parts of the plant such as growing tips of the shoots, the terminal buds, the flower cushions, the young cherelles and mature pods. Feeding of mealy bugs induces cherelle wilt. Following control measures are recommended.
When the infestation is lesser: Spraying of Neem Oil 3% or fish oil rosin soap 25g/litre In case of severe incidence, spraying of any one of the following chemicals is recommended : Dimethoate (2 ml/litre) , Profenophos (2 ml/litre), Chlorpyriphos (5 ml/litre), Buprofezin (2 ml/litre), Imidacloprid (0.6 ml/lit), Thiamethoxam (0.6g/litre) In the area where P. marginatus alone occurs, field release of Acerophagus papayae, the encyrtid parasitoid @ 100 per hamlet is recommended as the best management strategy.
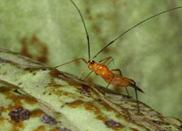
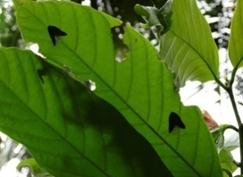
2. Tea mosquitoe bugs (Helopeltis antonii) Infested pods develop circular water soaked spots around the feeding punctures. These punctures subsequently turn pitch black in color. Deformation of pods occurs because of multiple feeding injuries.
Management
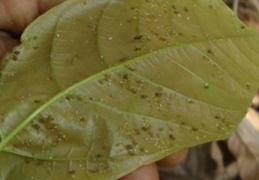
3. Flatid Plant hoppers Nymphs and adults suck the sap from flowers, tender shoots and pods. They excrete honey dew resulting in the development of sooty mould fungus on the leaves and pods.
Management: Foliar application of a newer molecule Thiacloprid @ 2 ml/litre twice at 5 days interval is recommended for the management of these flatid plant hoppers. 4. Aphids (Toxoptera aurantii and Aphis gossypii) They colonize on the underside of tender leaves, succulent stem, flower buds and small cherelles. Heavy infestation may occur during hot summer and after rainy season which brings about premature shedding of flowers and curling of leaves.
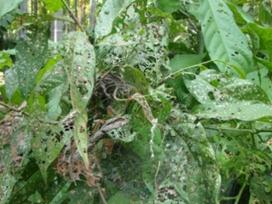
Management : Spraying of dimethoate @ 2 ml per litre 5.Hairy caterpillars (Lymantriya sp., Euproctis sp., Dasychira sp.,) They cause serious leaf damage on seedlings and young trees.
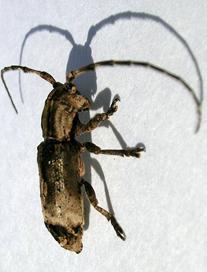
Management: Foliar spray of acephate @ 2g/litre of water 6. Stem Girdler, Sthenias grisator Damage was done by female beetle which girdles the branches and inserts whitish spindle shaped eggs singly into the tissue in a slanting manner. Due to mechanical injury caused by girdling and oviposition, the branches above the girdle wither and dry.
Management
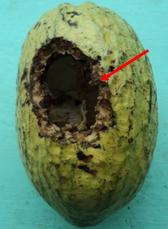
7. Non- Insect pests Rats (Rattus rattus) and squirrels (Funambulus trisriatus and F. palmarum) are the major rodent pests of cocoa. They cause serious damage to the pods. The rats usually gnaw the pods near the stalk portion whereas squirrels gnaw the pods in the center
Management
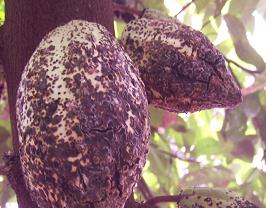
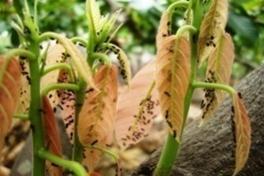
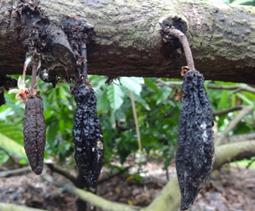
Diseases 1. Seedling blight (Phytophthora palmivora) The symptom develop on the leaves and stem of seedlings or budded plants. On leaves, small water soaked lesions appear which later coalesce in the blighting of leaves. On stem, water soaked lesions develop initially and later turn to black colour. Stem infection develop any point on the stem causing the death of seedlings. 2. Black Pod rot (Phytophthora palmivora) Infection appears as chocolate brown spot, which spreads rapidly and soon occupies the entire surface of the pod. As the disease advances, a whitish growth of fungus consisting of fungal sporangia is produced over the affected pod surface. Ultimately, the affected pods turn brown to black. The internal tissues as well as the beans become discolored as a result of infection. The beans in the infected pods approaching ripeness may escape infection because they are separated from the husk on ripening
Management: Periodically remove the infected pods. Spray 1 per cent Bordeaux mixture with on set of monsoon and also frequent intervals. Provide frequent drainage and regulate shade to increases aeration. Pseudomonas fluorescens (Pf1) liquid formulations @ 0.5% as soil and foliar spray (3 times per year- June, October & February) was found to be effective in reducing the Cocoa Pod rot and Stem canker. Preparation of 1% Bordeaux mixture Procedure:
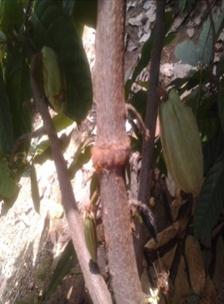
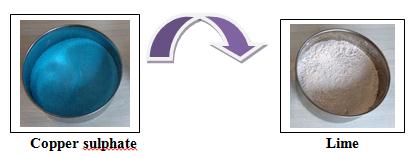
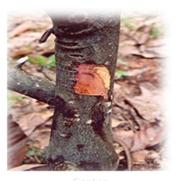
Bordeaux paste Bordeaux paste consists of same constituents as that of Bordeaux mixture, but it is in the form of a paste as the quantity of water used is too little. It is prepared by mixing 1 kg of copper sulphate and 1 kg of lime in 10 liters of water. The method of mixing solution is similar to that of Bordeaux mixture. 3. Stem Canker (Phytophthora palmivora) The cankers appear either on the main trunk, jorquettes or fan branches. The earliest symptom is the appearance of a greyish brown water soaked lesion on the outer bark. A reddish brown liquid oozes out from these lesions, which later dries up to form rusty deposits. The tissues beneath the outer lesion show reddish brown discoloration due to rotting.
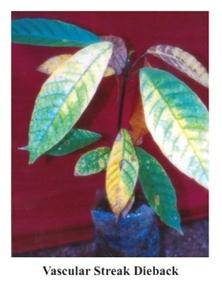
Management: It can be controlled in the initial stages by the excision of diseased bark followed by wound dressing with Bordeaux mixture or copper oxychloride paste .Wilted branches should be cut and removed. 4. Vascular Streak Dieback (VSD) It is reported from some parts of Kerala. The first indication of the disease is a characteristic yellowing of one or two leaves on the second or third flush behind the growing tip. Diseased leaves fall within a few days of turning yellow and the other leaves on the shoot show similar symptoms. When the infected shoot is split lengthwise there is always a characteristic brown streaking.
Management: The disease can be controlled by disposing diseased branches and regular pruning of chupons on the trunk. Cocoa nurseries should not be located near the diseased area. Avoid getting seedlings from diseased tracts. Kerala Agriculture University has developed some VSD resistant and high yielding varieties CCRP-1 to CCRP-7. 5.Cherelle wilt The shriveling and mummifying of some young fruits are a familiar sight in all cocoa gardens. In the early stages the fruits lose their lustre and in four to seven days they shrivel. The fruits may wilt but do not abscise. Many other factors like insects, diseases, nutrient competition and over production may also be associated with this problem. Hence, remedial measures will depend upon the nature of the causative factors involved.
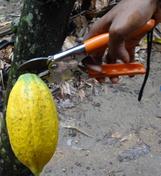
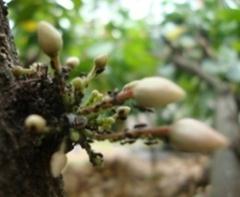
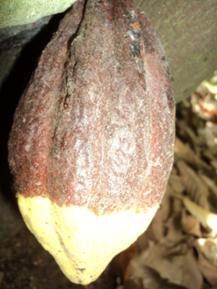
Harvesting and Processing Cocoa produces flowers from the 3rd year of planting onwards and economic yield starts from 5 th year. Properly well maintained (irrigation/ nutrient management) tree yielded 1-2 kg of pods / tree/ year. Pods take about 140 – 160 days to ripen. Generally, cocoa gives two main crops in a year, i.e. September – January and June to August. Offseason crops may be seen throughout the year especially under irrigated condition. The stage of maturity of the pod is best judged by change of color of pods. Pods that are green when immature turn yellow when mature and reddish pods turn yellow or orange. The change in color starts from the grooves on the pods and then spreads to the entire surface. . The harvesting is to be done at regular intervals of 10 -15 days. Avoid over ripening of pods. Yield: 50-70 pods/tree/year
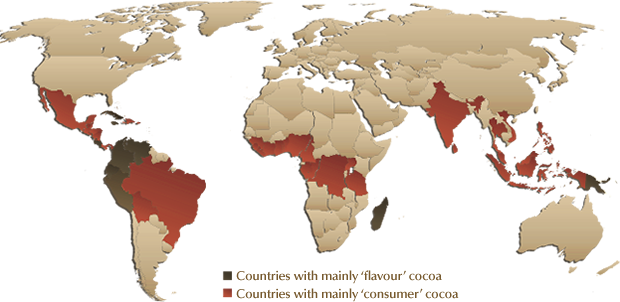
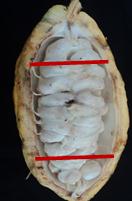
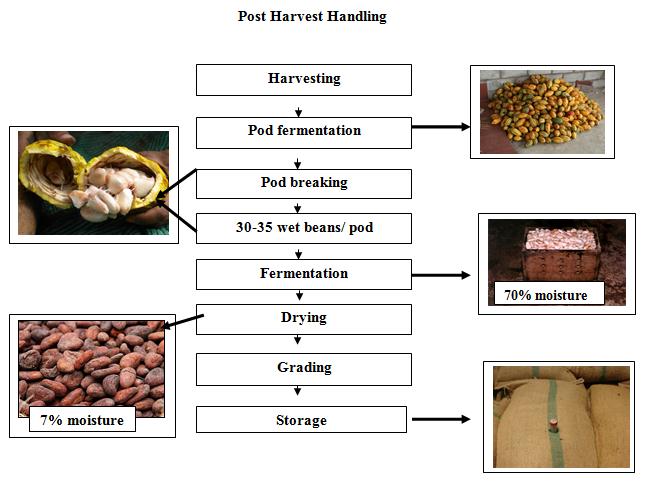
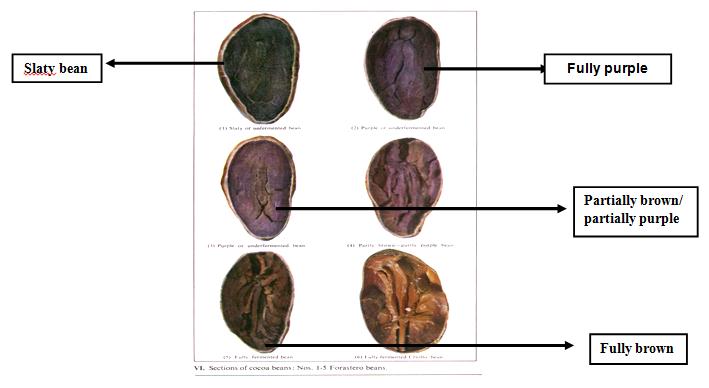
The pods are heaped together and kept under shade for 5-6 days to ensure uniform ripening. This reduces acidity and helps in development of a better flavor suited for chocolate making. Cocoa pods are collected at a central location, where pods are broken, husks removed and the white-yellowish seed masses are heaped together for fermentation. Fermentation takes about 5 to 7 days, depending on the season and temperature. Farmers sometimes mix the heap on the 2nd or 3rd day, to allow for aeration and a more uniform fermentation For breaking the pods, wooden billets may be used. After breaking the pods crosswise, the placenta should be removed together with husk and the beans are collected for fermentation. On an average 10-12 pods give 1 kg wet beans and 3 kg of wet beans (from 30-36 pods) give 1 kg of fermented and dried beans. Under normal cultivation practices, each cocoa tree yields about 1-2 kg annually. Fermentation Fermentation of cocoa beans is essential to remove the edhering mucilaginous pulp to develop flavour and aroma precursors, reduce bitterness and kill the germ of the seed and to loosen the testa. The process is simple but must be carried out properly in order to get beans for good quality. Different methods of fermentation normally followed are 1. Box 2. Basket. However, in this box and basket methods are recommended depending on quality of bean to be fermented. Box method The boxes of 60 cm X 60 cm X 45 cm made of wood and having reapers at the bottom to allow the sweating from the pulp to drain out and provide aeration are used. The boxes could be arranged in tiers for transferring beans from one to the next in line below. Two detachable wooden planks are provided on one side of the box for transferring (mixing) the beans by removing the planks. Basket methods In this method, Bamboo or cane baskets of suitable size could be used for fermenting small quantity of beans. One or two layers of banana leaves are placed at the bottom with provision to drain the sweating. The basket is filled with the beans and the surface is covered with banana leaves. A small weight is placed over the banana leaves. The basket is placed over a raised surface to facilitate drainage of the sweating for one day. Later the basket is covered with thick gunny bags. The beans are mixed thoroughly on the 3rd and 5th days and again covered with gunny bags. The fermentation will be completed at the end of 6th day and the beans withdrawn for drying. End point of fermentation Well fermented beans will be plumpy and filled with reddish brown exudates. The testa becomes loosened from the cotyledons. When cut open, the cotyledons will have a brownish colored with lots of ridges and furrow appearance in the centre with a brownish ring in the periphery. When above 50 per cent beans in a lot show the above signs, it can be considered as properly fermented. Drying During fermentation the cocoa flavour develops and the beans turn brown. After fermentation, the beans can be dried by sun drying. The fermented cocoa beans have considerable moisture (55 -69 %) and the drying rate is depend upon temperature and the airflow. Sun drying should be adopted as far as possible, as it gives superior quality produce compared to that by artificial drying. The moisture content of well dried beans is around 6 – 7 %. Slow drying is preferable for better quality of the beans. Grading and storage The flat, slate, shrivelled, broken and other extraneous materials are removed. The cleaned beans are packed in fresh polythene lined (150 – 200 gauge) gunny bags. The bags are kept on raised platform of wooden planks. The beans should not be stored in room where spices, pesticides and fertilizers are stored as they may absorb the odour from these materials. Bean quality Cocoa quality depends on various factors, but primarily on the cocoa variety and the post-harvest handling. Generally, fine or flavour cocoa beans are produced from Criollo or Trinitario varieties, while bulk cocoa beans come from Forastero trees.
Poor post-harvest handling can cause cocoa beans to be mouldy and/or germinated which reduces or diminishes the cocoa quality. Mouldy cocoa beans should be rejected on two counts, namely the tainting and off-flavours to the beans and possible contamination by mycotoxins (including ochratoxin). Source: | |||||||||||||||||||||||||||||||||||||||||||||||||||||||||||||||||||||||||||||||||||||||||||||||||||||||||||||||||||||||||||||||||||||||||||||||||||||||||||||||||||||
© All Rights Reserved. TNAU 2008 - 2024. |
|||||||||||||||||||||||||||||||||||||||||||||||||||||||||||||||||||||||||||||||||||||||||||||||||||||||||||||||||||||||||||||||||||||||||||||||||||||||||||||||||||||