|

I. SEASON AND VARIETIES
Districts/Season |
Varieties/Hybrid |
1. IRRIGATED |
|
i. Chithiraipattam (March-April) |
|
All pearl millet growing districts except Nilgiris |
CO 7, CO (Cu) 9, X 7, ICMV 221 |
|
|
ii. Masipattam (January-February) |
|
All pearl millet growing districts except the Nilgiris, |
CO 7, CO (Cu) 9, X 7, ICMV 221 |
|
|
2. RAINFED |
|
i. Adipattam (June-July) |
|
|
CO 7, CO (Cu) 9, X 7, ICMV 221 |
ii. Purattasipattam (September -October) |
CO 7, CO (Cu) 9, X 7, ICMV 221 |
II. PARTICULARS OF CUMBU HYBRIDS AND VARIETIES
PARTICULARS |
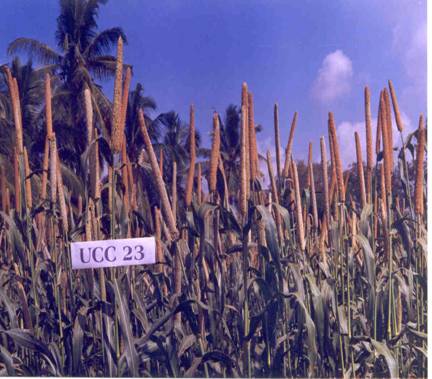
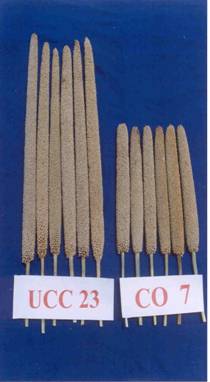
CO 7 |
X 7 |
CO (Cu) 9 |
ICMV 221 |
Parentage |
(CO 6 x PK 560) PT 1921 |
L111 A x
PT 1890 |
Selection from ICMV 93752 |
ICRISAT Composite |
Season-irrigated/ rainfed |
Both |
Both |
Both |
Both |
Duration (Days) |
90 - 100 |
90 |
80-85 |
75-80 |
Grain yield (kg/ha) |
|
|
|
|
Rainfed |
2500 - 2800 |
2513 |
2354 |
13% >ICTP 8203 |
Irrigated |
3000 - 3500 |
3295 |
2865 |
-- |
Plant height (cm) |
130 - 145 |
155 - 180 |
186-222 |
140-200 |
Tillers (No.) |
6 - 10 |
4 - 7 |
3-6 |
More tillering |
Pigmentation |
Green |
Non- pigmented |
-- |
-- |
Hairiness |
Glabrous |
Glabrous |
Glabrous |
Absent |
Days to 50% bloom |
65 - 70 |
50 - 55 |
50-55 |
50-55 |
Shape of earhead |
Conical/ cylindrical/ spindle |
Candle |
Candle to cylindrical |
Semicompact to compact lanceolate to oblanceolate |
Bristles |
Nil |
— |
Absent |
Usually non bristled |
Length of earhead |
22 - 26 |
25 - 35 |
33-39 |
-- |
(cm) |
|
|
|
|
Breadth of earhead |
3 - 4 |
— |
8-10 |
Wide in girth |
(cm) |
|
|
|
|
Grain colour |
Slate colour |
Slate |
Grey seed with yellow base |
Dark grey |
1000 grains weight (gm) |
6.8 - 7.2 |
8.0 - 9.0 |
9-11 |
10-15 |
Special features |
Resistant to downy mildew |
Resistant to downy mildew |
Resistant to downy mildew |
Resistant to downy mildew |
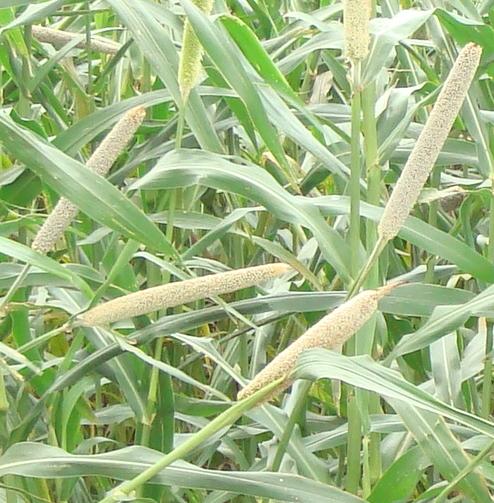
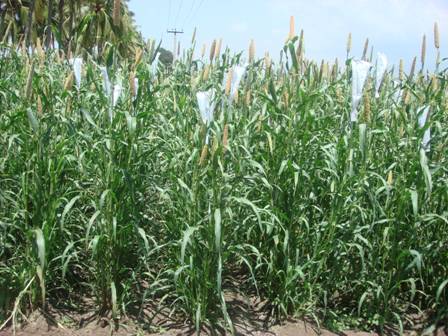
CUMBU (Pennisetum glaucum (L) R. Br. )

CROP MANAGEMENT
NURSERY
1. PREPARATION OF LAND
|
i. |
For raising seedlings to plant one ha select 7.5 cents near a water source. Water should not stagnate. |
|
ii. |
Plough the land and bring it to the fine tilth. |
2. APPLICATION OF FYM
Apply 750 kg of FYM or compost and incorporate by ploughing. Cover the seeds with 500 kg of FYM.
3. FORMING RAISED BED
i. In each cent mark 6 plots of the size 3 m x 1.5 m with 30 cm channel in between the plots and all around.
ii. Form the channel to a depth of 15 cm.
iii. Spread the earth excavated from the channel on the beds and level.
NOTE: The Unit of 6 plots in one cent will form one unit for irrigation.
4. REMOVAL OF ERGOT AFFECTED SEEDS AND SCLEROTIA TO PREVENT PRIMARY INFECTION
i. Dissolve one kg of common salt in 10 litres of water.
ii. Drop the seeds into the salt solution
iii. Remove the ergot and sclerotia affected seeds which will float.
iv. Wash seeds in fresh water 2 or 3 times to remove the salt on the seeds.
v. Dry the seeds in shade.
vi. Treat the seeds with three packets (600g) of the Azospirillum inoculant and 3 packets (600g) of phosphobacteria or 6 packets (1200g) of azophos.
5. TREATMENT OF THE NURSERY BED WITH INSECTICIDES
Apply phorate 10 G 180 g or Carbofuran 3 G 600 g mixed with 2 kg of moist sand, spread on the beds and work into the top 2 cm of soil to protect the seedlings from shootfly infestation.
6. SOWING AND COVERING THE SEEDS
- Open small rills not deeper than 1 cm on the bed by passing the fingers over it.
- Sow 3.75 kg of seeds in 7.5 cents (0.5 kg / cent) and use increased seed rate upto 12.5 kg per ha in shootfly endemic area and transplant only healthy seedlings.
- Cover the seeds by smoothening out the rills with hand. Sprinkle 500 kg of FYM or compost evenly and cover the seeds completely with hands.
NOTE: Do not sow the seeds deep as germination will be affected.
7. IRRIGATION TO THE SEED BED
i. |
Provide one inlet to each unit of 6 plots to allow water in the channels. |
ii. |
Allow water to enter the channel and rise up in it. Turn off the water when the raised bed is wet. |
iii. |
Irrigate as per the following schedule. |
Light Soil |
Heavy Soil |
1st |
immediately after sowing |
Immediately after sowing |
2nd |
on 3rd day after sowing |
On 3rd day after sowing |
3rd |
on 7th day after sowing |
On 9th day after sowing |
4th |
on 12th day after sowing |
On 16th day after sowing |
5th |
on 17th day after sowing |
|
Note: 1. The seedlings should not be kept in nursery for more than 18 days. Otherwise the
establishment and yield will be affected adversely.
2. Ensure that cracks should not develop in the nursery. This can be avoided by properly adjusting the quantity of irrigation water.
PREPARATION OF MAIN FIELD
1. FIELD PREPARATION
i. |
Plough with an iron plough twice and with country plough twice. Bring the soil into fine tilth. |
ii. |
CHISELING FOR SOILS WITH HARD PAN: Chisel the soils having hard pan formation at shallow depths with chisel plough at 0.5m interval, first in one direction then in the direction perpendicular to the previous one, once in three years. |
2. APPLICATION OF FYM OR COMPOST
Spread 12.5 t/ha of FYM or compost or composted coir pith uniformly on unploughed soil. Incorporate the manure by working the country plough and apply Azospirillum to the soil @ 10 packets per ha (2000 g) and 10 packets (2000g) of phosphobacteria (or) 20 packets (4000g) of azophos with 25kg of soil and 25 kg of FYM.
3. FORMING RIDGES AND FURROWS/BEDS
i. Form ridges and furrows (using 3 ridges) 6 m long and 45 cm apart. If pulses is intercropped, form ridges and furrows 6 m long and 30 cm apart.
ii. If ridge planting is not followed, form beds of the size 10 m2 or 30 m2 depending upon water availability.
iii. Form irrigation channels.
iv. To conserve soil moisture under rainfed condition, sow the seeds in flat and form furrows between crop rows during intercultivation on third week after sowing.
4. APPLICATION OF FERTILIZERS
Apply NPK fertilizers as per soil test recommendations as far as possible. If soil test recommendation is not available follow the blanket recommendation of 70:35:35 kg N, P2O5, K2O/ ha for all varieties. For hybrids, apply 80 kg N, 40 kg P2O5 and 40 kg K2O per ha. Apply the recommended N in three splits as 25:50:25 per cent at 0,15 and 30 DAS and full dose of phosphorus and potassium basally. Combined application of azospirillum and phosphobacteria or azophos along with 75 per cent of the recommended level of N and P is recommended for rainfed conditions.
Method of application: For transplanted crop, open a furrow more than 5 cm deep on the side of the ridge (1/3 distance from the bottom), place the fertilizer and cover. For the direct sown crop, mark the lines more than 5 cm deep 45 cm apart in the beds. Place the fertilizer below 5 cm depth and cover upto 2 cm from the top before sowing. In the case of intercropping with pulses, mark lines more than 5 cm deep 30 cm apart in the beds. Apply fertilizer only in the rows in which cumbu is to be sown and cover upto 2 cm. When azospirillum inoculant is used for seeds, seedlings use only 50 kg N/ha for variety, 60 kg N/ha for hybrid, as soil application in other words, reduce 25% N of soil test recommendations.
5. APPLICATION OF MICRONUTRIENT MIXTURE
Apply 12.5 kg/ha of micronutrient mixture formulated by the Department of Agriculture. Mix the mixture with enough sand to make 50 kg and apply on the surface just before planting/after sowing and cover the seeds. Broadcast the mixture on the surface to seed line. If micronutrient mixture is not available apply 25 kg of zinc sulphate per ha. Mix the chemical with enough sand to make 50 kg and apply as above.
MANAGEMENT OF MAIN FIELD
1. TRANSPLANTING SEEDLINGS OR SOWING PRE-TREATED SEEDS Transplanted Crop
- Pull out the seedlings when they are 15 to 18 days old.
- Adopt the spacing 45 x 15 cm for all the varieties.
- Plant seedlings on the side of ridge, half way from the bottom. Depth of planting should be 3 to 5 cm.
- Root dipping with bio-fertilizers: Prepare the slurry with 5 packets (1000 g)/ha of Azospirillum inoculant and 5 packets (1000g/ha) of phosphobacteria or 10 packets of azophos (2000g/ha) in 40 lit. of water and dip the roots of the seedlings 15 - 30 minutes before planting.
Direct sown crop
Soaking of cumbu seeds either in 2% Potassium chloride (KCl) or 3% Sodium Chloride (NaCl) for 16 hours followed by 5 hours shade drying improves germination and stand.
i. Adopt the spacing of 45 x 15 cm for all varieties. If pulse is intercropped, adopt a spacing of 30 x 15 cm for cumbu and 30 x 10 cm for pulses. One pair row of cumbu is alternated with a single row of pulse crop.
ii. In the furrows in which fertilizers have been applied, place 5 kg of seed, allowing them to fall 4 - 5 cm apart (Use higher seed rate of 5 kg to offset mortality). The optimum population should be 1, 45,000 per ha. Use increased seed rate upto 12.5 kg per hectare in shoot fly endemic area and remove the shootfly damaged seedlings at the time of thinning.
iii. Where pulse seeds are to be sown, drop pulse seeds to fall 5 cm apart and cover.
2. WEED MANAGEMENT
Transplanted crop
Spray Atrazine 50 WP 500 g/ha on the 3rd day. Then, one hand weeding on 30 - 35 days after transplanting may be given. If herbicide is not used hand weed on 15th day and again between 30 and 35 days after transplanting.
Direct Sown crop
i. Apply the pre-emergence herbicide Atrazine 50 WP at 500 g/ha, 3 days after sowing as spray on the soil surface using Back-pack/Knapsack/Rocker sprayer fitted with flat type nozzle using 900 l of water/ha.
ii. Apply herbicide when there is sufficient moisture in the soil.
iii. Hand weed on 30 - 35 days after sowing if pre-emergence herbicide is applied.
iv. If pre-emergence herbicide is not applied hand weed twice on 15 and 30 days after sowing.
3. THINNING AND GAP FILLING
In direct sown crop after 1st weeding at the time of irrigation, gap fill and thin the crop to a spacing of 15 cm between plants; cowpea crop to 20 cm between plants and other pulses crops to 10 cm between plants.
4. TOP DRESSING OF FERTILIZERS
- Top dress the nitrogen at 15 and 30 days after transplanting or direct sowing.
- In transplanted crop, open a furrow 5 cm deep with a stick or hoe at the bottom of the furrow, place the fertilizer and cover.
- In the case of direct sown crop apply the fertilizer in band. If intercropped with pulses apply the fertilizer to cumbu crop only.
- After the application of fertilizer, irrigate the crop.
WATER MANAGEMENT
|
|
|
Days after transplantation/sowing |
STAGES |
|
Transplanted Crop |
Direct Sown Crop |
Light Soils |
|
|
|
|
i. Germination |
|
|
1st day after transplanting |
1st day after sowing |
|
|
|
4th day |
4th day |
ii. Vegetative phase |
|
|
15th Day |
17th day |
|
|
|
28th day |
30th day |
iii. Flowering phase |
|
|
40th day |
42nd day |
|
|
|
52nd day |
55th day |
|
|
|
65th day |
68th day |
iv. Maturity phase |
|
|
77th day |
79th day |
Total |
8 irrigations |
8 irrigations |
Heavy Soils |
|
|
|
|
i. Germination |
|
|
1st day after planting |
1st day after sowing |
|
|
|
4th day |
5th day |
ii. Vegetative phase |
|
|
15th day |
15th day |
|
|
|
28th day |
30th day |
iii. Flowering phase |
|
|
42nd day |
45th day |
|
|
|
54th day |
57th day |
iv. Maturity Phase |
|
|
66th day |
70th day |
Total |
7 irrigations |
7 irrigations |
NOTE: This is only a guideline and the irrigation schedule is to be adjusted depending upon the prevailing weather conditions.
HARVESTING THE CROP
1. SYMPTOMS OF MATURITY
i. Leaves will turn yellow and present a dried appearance.
ii. Grains will be hardened.
2. HARVESTING
i. Cut the earheads separately.
ii. Cut the straw after a week, allowing it to dry and stack it in the field till it can be transported.
3. THRESHING, CLEANING, DRYING AND STORING
- Dry the earheads
- Thresh in a mechanical thresher or
- Spread it and drag a stone roller over it or
- Cattle thresh.
- Dry the seeds below 10 per cent and mix 100 kg of grains with 1kg of activated kaolin to reduce the rice weevil and rice moth incidence.
- Spray Malathion 50EC 10 ml/ lit @ 3 lit of spray fluid/100 m2 over the bags during storage godowns,
- For grain purpose the grain should be dried well below 10% moisture and stored in gunny bags.
|


