Coconut Mother Palm Selection & Nursery Management
The need for collecting seed materials from high yielding coconut palms is highly essential in a perennial crop like coconut.
The following points may be remembered. (Click the respective topic to navigate this page)
- Selection of Seed Gardens
- Mother Palm Selection
- Selection of Seed Nuts
- Storage of Seed Nuts
- Nursery Management
 |
Selction of Garden |
- Gardens should have palms with a high proportion of heavy bearers but it should be kept in mind that this must not be from very favourable conditions. Garden should be free from the incidence of diseases and not prone to severe attacks of pests.
- Trees growing closer to households, cattle shed, compost pits and other favorable conditions should be avoided.
- Certain centres are well known for good quality seed nuts and seedlings, e.g, in Kerala, Kuttiadi in Kozhikode and Chavakkad in Thrissur districts.
For production of quality planting materials it is essential to have good quality mother palms of the desired varieties. In the absence of commercially viable vegetative propagation techniques only seed propagation is possible. Therefore mother palm selection is a key factor in planting material production of coconut.
The important features of superior mother palms are:
 |
 |
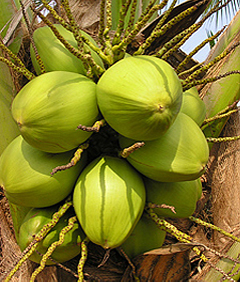
Ideal Mother Palm |
Ideal Seed Nut |
- Regular bearer - A good regular bearing mother palm produces on an average one leaf and an inflorescence in its axil every month. So, there will be twelve bunches of varying stages of maturity at any one time with strong bunch stalks. Avoid trees producing habitually barren nuts.
- Straight stout trunk with even growth and closely spaced leaf scars.
- Spherical or semi spherical crown,
- High rate of leaf (more than 30 fully opened leaves) and spathe production (12 inflorescences)
- Short and stout petiole and wide leaf base firmly attached to the stem,
- Short and stout inflorescence stalk with bunches, preferably resting on the leaf petioles of the lower whorl and more number of female flowers (25 or more)
- The age of the palm chosen be middle age i.e., from 25 to 40 years. Even trees with 15 years age can be selected, if it is high yielding and has stabilized yield.(eg, Chowghat dwarf ) Avoid palms that are above 60 years.
- High yielding mother palms giving not less than 100 nuts/palm/annum under irrigated condition (70-80 nuts/annum under rainfed conditions) should be chosen for collecting seednuts
- Husked nuts should weigh not less than 600 g.
- Mean copra content of 150 g per nut or more
- Free from pest and diseases.
Avoid palms which...
(i) Palms have long, thin and pendulous inflorescence stalks
(ii) Palms produce long, narrow, small sized or barren nuts
(iii) Palms showing alternate bearing tendency also should be avoided.
(iv) Palms show shedding of immature nuts in large numbers and
(v) Palms are grown under favourable environmental conditions eg. Trees near manure pits.
Strategy for root wilt diseased tracts:
In the root wilt disease prevalent tracts, in the midst of heavily diseased palms, high yielding disease free West Coast Tall (WCT), Chowghat green dwarf (CGD) and Chowghat Orange Dwarf (COD) palms are found. Such palms can be selected as mother palms and open pollinated nuts of those palms can be used for large scale planting material production. Seedlings produced from these palms are expected to be high yielding and disease free.
Harvest seednuts during the months of February - August in Tamil Nadu, December to May in Kerala to get maximum germination and good quality seedlings. Generally seed nuts are harvested during February-May and planted in June in the west coast region, whereas sowing is done in October-November in East Coast region. Nut should not be damaged while harvesting. Discard nuts having irregular shape and size. Tall varieties are sown one or two months after collection whereas dwarfs should be sown immediately after harvest (within 10 to 15 days).
 |
 |
Harvested Nuts |
Selected Healthy Nuts |
Click here for more photos...
Maturity of Seed nut: The mature nuts are harvested when atleast one nut in the oldest bunch starts becoming dry. In Talls, it takes 11-12 months to become a matured seed nut whereas in dwarfs, nuts will mature in 10-11 months after emergence of the inflorescence. In general dwarf palms are to be harvested once in four weeks and tall palms are to be harvested once in six to eight weeks. They produce a resonant and ringing sound when hit with the harvesting knife or tapped by finger indicating that the husk is dry. Immature nuts will produce a dull sound. Harvest the bunches intended for seednut by lowering them to the ground using a rope to avoid injury to seednuts when palms are tall and ground is hard. The seednuts should be medium sized, round or oblong in shape.
 |
 |
Nuts are Covered with Coconut Leaves |
Stored in Room Condition |
To get more quality seedlings, the seednuts of tall and hybrid are to be air cured for one month followed by sand curing for two months. For dwarf varieties, the air curing should be lesser than one month followed by sand curing for two months. In general seed nuts of tall variety are stored upto two months after harvest and dwarfs are sown within 15 days. For storing, arrange the seed nuts with the stalk-end up over an 8 cm layer of sand in a shed and cover with sand to prevent drying of nut water. Up to five layers of nuts can be arranged one over the other. The nuts can also be stored in plots, provided the soil is sandy and the ground is sufficiently shaded. In the case of nuts harvested in May, heap them in partial shade, till husk is well dried and then sow them in the nursery. Nuts without splashing sound indicate that the nut water has become dry and hence they should not be used for sowing.
Soil:
Select nursery area in a well drained plot with friable, sandy loam/loam soils are best suited for coconut nursery due to the relative ease in removing the seedlings from the nursery.
In Laterite soils, sand has to be applied to the nursery beds.
Heavy clayey soils and waterlogged soils are to be avoided.
The ideal soil pH ranges from 5.5 to 7.0 and the seedlings are tolerant to a pH range from4.5 to 8.5.
Under irrigation, coconut seedlings tolerate saline and alkaline soils.
Nursery Structures:
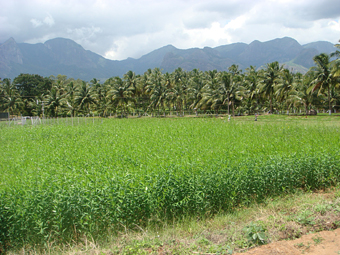
Nursery can be raised in the interspaces of the coconut plantation.
The nursery area is to be provided with shade using 50-75% shade net if the nursery area is an open space.
About 120 m2 areas required to sow 1000 nuts in flat or raised beds whereas larger area of 200 m2 would be required to maintain 1000 poly bag coconut seedlings.
 |
 |
Nursery area between coconut |
Nursery in shaded condition |
Click here for more photos...
Time of sowing: Sowing of seed nuts with commencement of the rainy season will reduce the frequency of irrigation required for getting good germination.
Generally seed nuts are harvested during April May and planted in June in the west coast region, whereas sowing is done in October-November in East Coast region.
However seed nuts can be sown throughout the year under favourable climatic conditions and good irrigation facilities.
Nursery bed preparation: Prepare beds of 1- 1.5 m width and of convenient length with 75 cm space between beds. In areas where drainage is poor, prepare raised beds (10-20 cm height). The seed beds should be drenched with Chlorpyriphos @0.05% before sowing of seed nuts, in areas having termite problem. To prevent bud rot in seedlings, the nursery can be drenched with 1% Bordeaux mixture, in bud rot endemic areas.
 |
 |
Nursery Bed |
Nursery Preparation |
(i). Method of planting seed nuts
 |
 |
Nursery Bed - Top portion visible |
Spacing size - 30 to 30 cm |
- Before planting, examine seed nuts and discard those without nut water and rotten kernels.
- Some seed nuts, even though they are without nut water, may germinate. Such seed nuts may be soaked in water for 24-36 hours prior to sowing.
- Plant seed nuts in beds, at a spacing of 30 x 30 cm, either horizontally or vertically in deep trenches with 20-25 cm depth.
- The nuts may be planted either horizontally with the widest of the segments at the top or vertically with stalk-end up.
- The seedlings raised by following vertical planting suffer more from drought and are less robust than those from flat or horizontal method and seedlings obtained by this method are less likely to be damaged at transplanting because the attachment between shoot and nut is much better protected by the husk.
- With horizontal planting rate of germination and subsequent growth of seedlings will be faster compared to vertical planning. Notching hastens the germination of vertically planted nuts.
- Cover with soil so that top portion of husk alone is visible as it helps to prevent possible infection of the collar region of the emerging seedlings. Five rows of nuts may be planted in each bed accommodating 50 nuts per row.
(ii). Management of Nursery
Irrigation Management:
Water Source - A perennial source of water is required for maintenance of coconut palms and irrigation is essential for obtaining good coconut yield.
Sprinkler / Micro Jet Sprinkler / Hose Iirrigation Systems are well suited for irrigating coconut nurseries.
After sowing the seed nuts should be irrigated thoroughly to saturation levels. The seed beds should be irrigated regularly to ensure that the soil is moist. During summer months, the beds may be irrigated on alternate days. About 10 mm of water should be applied for every irrigation.
 |
 |
Irrigation Channel |
Irrigation after Planting |
Click here for more photos...
Mulching: The seed beds can be covered with suitable mulch after the cessation of monsoon rain. Coconut leaves, straw or green leaves are used. This is done to conserve moisture and to check weed growth.
Provide protective fencing to the nursery if it is located in open area. Keep the nursery beds free of weeds by periodic weeding. Provide shade to the nursery by raising Sesbania or Leucaena on the sides of beds.
Weeding:
The nursery should be kept free of weeds to allow good growth of the seedlings.
Germination of seedlings:
Seed nuts of tall varieties begin germination within 60-130 days after sowing and seed nuts of dwarf varieties usually germinate 30-95 days after sowing. Generally germination is recorded till the fifth month of sowing and a good seed lot will have 80-90% germination. Seed nuts that do not germinate within 5 months can be removed from the nursery and used for production of copra.
Fertilizer application:
Chemical fertilizers need not be applied to the seedlings in the nursery since the seedlings are usually nourished by the endosperm. Moreover application of chemical fertilizers can mask the true genetic potential of seedlings.
Poly bag seedling production (Source: Coconut Cultivation Practices, CPCRI, 2007)
Poly bag nursery can be adopted for
- Producing more vigorous seedling with better root system.
- Better establishment and early bearing
- Reduced transplanting shock as no root damage
- easier weeding, watering and elimination of unwanted seedlings
Inorder to produce poly bag seedlings, the seed nuts are initially sown very closely and allowed to germinate in a pre nursery bed till the sprouts are 8-10 cm long. The germinated seedlings are picked out from the nursery once 80% of the nuts have germinated or 5 months from sowing, whichever is earlier.
Germinated seeds are transplanted in poly bags (500 gauge thickness) of size 60*45 cm for bigger nuts and 45 *45 cm for smaller nuts. Polybags of the first size require 13-16 kg of top soil to fill two thirds of the bag. The bottom of the bag is provided with 8-10 holes for draining the excess water. The germinated nuts are placed in half filled poly bags with the sprout positioned upwards in the centre of the bag and sufficient potting mixture is added to fill two-third portion and the sides slightly pressed to keep the nut firm.
The commonly used potting media are top soil mixed with sand in 3:1 ratio or 3:1:1 ratio of top soil, sand and FYM/vermicompost. Red earth, sand and FYM/vermicompost in 1:1:1 ratio can also be used. Fertilizers can also be applied in poly bags@ 20g ammonium sulphate and 25 g Muriate of potash per bag after 2 months of germination and 45g ammonium sulphate and 45 g Muriate of potash per bag after 4 months of germination. Seedlings should be irrigated after fertilization.
The disadvantages include difficulty for transportation and higher cost of seedling production.
Spray the seedlings with 1% Bordeaux or any other Copper Fungicides to prevent pest and disease attack.
(iii). Selection of seedlings
Remove seed nuts, which do not germinate within 6 months after sowing as well as those with dead sprouts. Select only good quality seedlings (9-12 months old) by a rigorous selection based on the following characteristics.
 |
 |
Ideal Seedling |
Stage-wise growth of seedling |
Click here for more photos...
1. Early germination, rapid growth and seedling vigour.
2. Six to eight leaves for 10-12 month old seedlings and at least four leaves for 9 month old seedlings.
3. Collar girth of 10-12 cm.
4. Early splitting of leaves is a good indicator of the rapid development and early bearing.
The colour of the petiole and seedling vigour can be used as a selection criterion for dwarfs and hybrids. The dwarfs should exhibit the petiole colour of the mother palm. Hybrids usually exhibit hybrid vigour at the seedling stage itself. Seedlings of dwarf varieties can be easily identified by their early germination, short height, short and sturdy leaves with short and narrow leaflets. Seedlings of tall varieties usually grow tall with long leaves and long and broad leaflets.
Note: The recovery of quality seedlings will be about 60-65%. Since early germination is one of the criteria for the selection of seedlings, the storing and sowing of seed nuts should be in lots rather than in a staggered manner.
- For planting in water logged areas, 11/2 to 2 year old seedlings are preferred.
- Eliminate the seedlings which are deformed or having stunted growth.
(iv). Important diseases / pests and their management
There are no serious pests and diseases in coconut nurseries. However, bud rot affected seedlings are to be avoided for planting.
Bud Rot:
The fungus, Phytophthora palmivora, causes this disease. The symptoms are yellowing and withering of the spindle leaf followed by drying and the death of the seedlings. The spindle of the affected seedlings will easily come out with a gentle pull and rotting can be seen in the lower end of the detached leaf. The affected portion emits a foul smell. Though it is not a major problem in coconut nurseries, the affected seedlings are to be removed and the surrounding seedlings treated with 1% Bordeaux mixture. Seed nuts dip with Copper oxychloride 0.25%.
 |
 |
But Rot Disease |
|
Scale Insect (Asipidiotus destructor):
The characteristic symptom is yellowing of leaves and presence of scale insect underneath the leaves. Though the insect does not pose serious threat to the seedlings, this can be controlled by drenching the nursery with Dimethoate @ 0.05% to ensure good quality and healthy foliage of seedlings.
 |
 |
Scale Insect |
|
Termite:
Drying of the sprouts and leaves are the symptoms of termite damage in the nursery. If termite is noticed, remove soil in the affected area up to a depth of about 15 cm and dust soil and nuts with carbaryl or chlorpyrifos (chlordane 5% dust @ 120 kg/ha – CPCRI) or drench the nursery with Chlorpyriphos @ 0.05%will control the termites. Repeat if attack persists. Periodically spray the plants with 1% Bordeaux mixture or any other copper fungicide to prevent fungal infection.
White Grub (Leucopholis coneophora): This occurs mainly in sandy soils. The characteristic symptom is yellowing of leaves followed by drying of leaves and death of the seedlings due to severe root damage. This can be controlled by application of Phorate 10g @15g/ seedling.
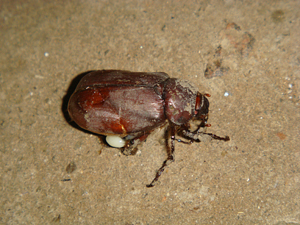 |
White Grub |
(v). Removal and transporting of seedlings
Video: Removal of seedlings |
- Remove seedlings from the nursery by lifting with spade and cutting the roots. Never allow lifting the seedlings from the soil by pulling the leaves or stem
- Plant seedlings as early as possible after removal from nursery. The seedlings can be kept for about four weeks under careful storage after removal from the nursery. In such cases, keep the seedlings in shade and do not expose to sun. Irrigate them to keep them moist.
- Seedlings can be compactly packed and transported. For very long distance transportation, special care should be taken to pack the seedlings in moss/coir pith/ other moisture retaining material. Poly bag seedlings can be transported as such and planted directly in the field after cutting and removing the base of the poly bag to facilitate growth of roots.